Sunday, February 15, 2026

A Conversation That Changed How I Think About Backend Systems - Part I


Me:

I think our API servers will be the first thing to break if we get a million users.

Him:
Why do you think that?

Me:
Because… more users means more requests. The APIs will get overloaded, right?

He smiled. Not the “you’re wrong” smile — the wait and think one.


“Are the APIs really doing the work?”

Him:
When an API receives a request, what does it actually do most of the time?

I paused.

Me:
It… validates input, runs business logic, calls the database, and returns a response.

Him:
Exactly. Now tell me — which part takes the longest?

That’s when it clicked.

Me:
Waiting on the database.

Him:
Good. So if an API is slow, is it really the API that’s slow?


The first bottleneck appears

In large systems, API servers rarely struggle because of computation.
They struggle because they wait.

They wait for:

  • Database queries

  • Cache misses

  • External services

  • Network I/O

At scale, waiting is more dangerous than working.


“The database is the fragile one”

Me:
So the database is the real bottleneck?

Him:
Usually, yes.

Databases are:

  • Expensive

  • Shared by everything

  • Hard to scale compared to APIs

Even fast queries can bring a system down if too many of them run at once.


“Then make the database work less”

That was his next sentence.

Me:
How?

Him:
Why hit the database every time if the data hasn’t changed?

That’s when caching entered the picture.


“But what about stale data?”

I pushed back.

Me:
Caching means users might see old data.

Him:
Correct. Now ask the real question.

Me:
Which data is allowed to be wrong… briefly?

User profile data — names, avatars — felt safe.
Payments and permissions did not.

This was the first time I understood that consistency is a business decision, not just a technical one.


Time-based freshness instead of perfection

For low-risk data, we agreed on a simple rule:

  • Cache it

  • Set a TTL

  • Let it refresh naturally

For user profiles, something like 10–30 minutes is often acceptable.


Fast system.
Slight staleness.
Happy users.

Or so I thought.


“What happens when everyone comes at once?”

He wasn’t done.

Him:
What happens if a popular user’s cache expires and a million requests arrive at the same second?

I knew the answer before saying it.

Me:
They all hit the database.

Him:
Exactly.

That problem has a name: cache stampede.


Multiply that by a million — and the database collapses.


“Protect the database, always”

His rule was simple:

The database must survive, even if the system degrades.

One effective safety net is rate-limiting database reads:

  • Not to be fast

  • But to avoid total failure

Combined with serving slightly stale data, the system degrades gracefully instead of crashing.


The real lesson

That conversation changed how I think about backend systems.

Large-scale design is not about:

  • Eliminating all risk

  • Making everything perfectly fresh

It’s about:

  • Knowing where the bottleneck is

  • Protecting the most fragile layer

  • Accepting controlled imperfection

  • Designing for failure, not just success

Much later, I realized something else.

He wasn’t just teaching backend systems.

He was teaching me how architects think.


More conversations like this coming soon.

Monday, February 6, 2023

Python Literals: Understanding the Building Blocks of Python Programming

 Python is a high-level programming language that is widely used for web development, data analysis, and artificial intelligence. One of the fundamental building blocks of Python programming like many other programming languages is literals, which are fixed values used to represent data in a program. In this article, we will discuss what literals are and how they are used in Python.

What are Python Literals?

Literals in Python are fixed values that can be used to represent data in a program. They can be numbers, strings, booleans, or special objects that represent complex data structures, such as lists, tuples, sets, and dictionaries. Literals are used to create objects that have a fixed value and cannot be changed during the execution of the program.

Types of Python Literals

  1. Numeric Literals: Numeric literals in Python can be either integers or floating-point numbers. Integer literals are written as a sequence of decimal digits, while floating-point literals are written with a decimal point. For example, the integer literal 10 and the floating-point literal 3.14 are both valid numeric literals in Python.

    Also, binary, octal, hexadecimal representations of the numeric literals can be declared in python using their appropriate prefix with zero (0).

    binary = 0b11
    octal = 0o765
    hexa = 0xab10
  2. String Literals: String literals in Python are sequences of characters enclosed in quotes, either single quotes (') or double quotes ("). For example, "Hello, World!" is a valid string literal in Python.

  3. Boolean Literals: Boolean literals in Python are either True or False. They are used to represent logical values and are often used in control structures, such as if-else statements.

  4. Complex Literals: Complex literals in Python represent complex numbers and are written in the form x + yj, where x is the real part and y is the imaginary part. For example, 3 + 4j is a valid complex literal in Python.

  5. Special Literals: Special literals in Python represent special objects that have specific meanings, such as None, which represents the absence of a value.

How to Use Literals in Python

Literals can be used in various ways in Python programs. For example, they can be assigned to variables, used as arguments in function calls, or used as elements in data structures, such as lists, tuples, and dictionaries.

For example, the following code demonstrates how to use numeric, string, and boolean literals in Python:

# Assigning numeric literals to variables
a = 10
b = 3.14

# Assigning string literals to variables
name = "Feather"

# Assigning boolean literals to variables
is_active = True

Conclusion

In conclusion, literals are an essential part of Python programming and play a crucial role in representing data in a program. They can be numbers, strings, booleans, or special objects and are used to create objects with a fixed value. Understanding literals is key to becoming a proficient Python programmer and is the foundation for more advanced concepts, such as data structures, functions, and control structures.

Saturday, June 25, 2022

Sending Emails from Python Django using your gmail account

Normally applications need to send the verification code or welcome messages to the registering user for their application using emails. 

Sending email is not hard in if we are developing the backend of the application using Python or Python framework like Django. 

As the first step we need to configure our gmail account to allow us to send email using code without login in to gmail and sending manually. 

  1. Login to your gmail account 
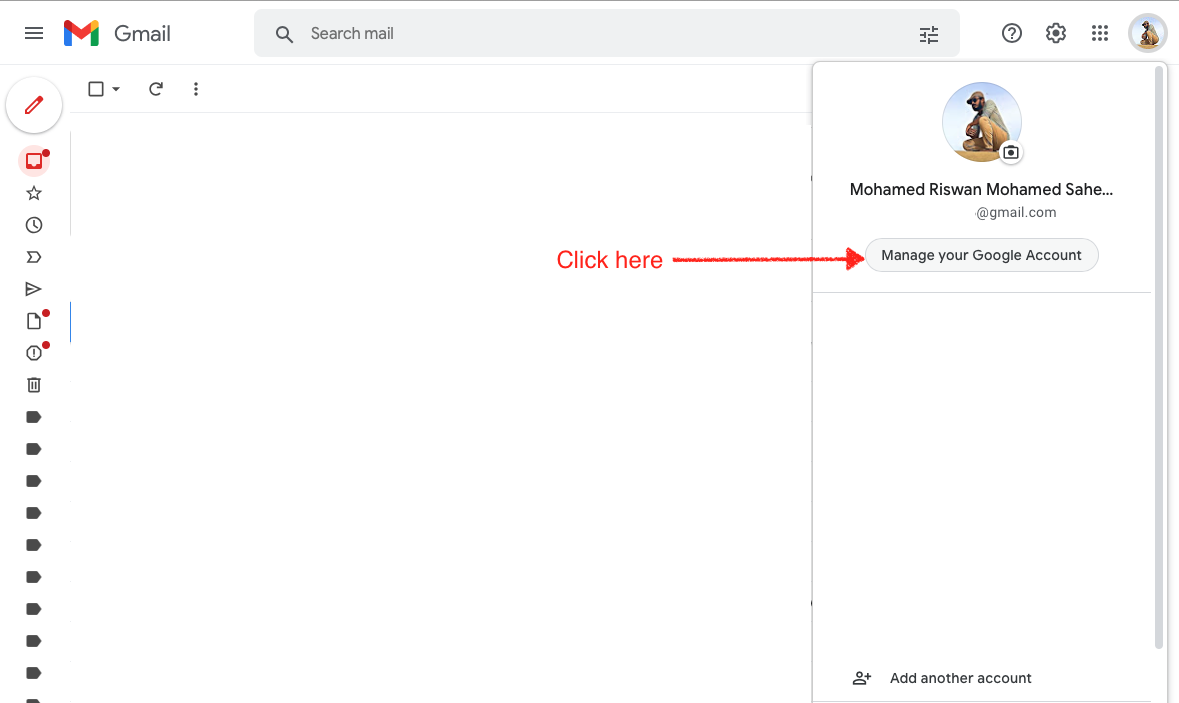
  2. Click on the profile icon shown in the top right corner of the browser window in gmail
  3. Click on "Manage your Google Account" button like shown in the below image.


  4. Choose Security tab in the screen shown after the above step


  5. Scroll down to see the section "Signing in to Google" section
  6. Enable two step verification there by giving your mobile number or some other method of verification. 

  7. Once clicked on Get Started button on the popup ti will ask you to login again.
  8. Once the above step finished you can see a new item in the "Signing in to Google" section which will look like the below

  9. Click on the App passwords in the above mentioned window which will open up another screen where you have to select the custom app name and generate a password. 


  10. Once you give a name for your app the "GENERATE" button will be enabled click on it to generate the password and copy the password. The password shown here is only showing one time there for carefully copy it and past it in a place where you can access later.
We have finished the configuration of gmail now. We can use the gmail as the sender email in our Django code.

Goto the Django settings file and make the configuration settings like below 

EMAIL_BACKEND = 'django.core.mail.backends.smtp.EmailBackend'
EMAIL_HOST = 'smtp.gmail.com'
EMAIL_USE_TLS = True
EMAIL_PORT = 587

EMAIL_HOST_USER = 'your_username@gmail.com' # replace your_username
EMAIL_HOST_PASSWORD = 'xxxxxxxxxxxxxxxx' # use password generated above

In your model file you need to import the EmailMultiAlternatives from Django core module then you can send the email using the below lines of code.

from django.core.mail import EmailMultiAlternatives  

message = EmailMultiAlternatives(
subject = subject,
body = body,
from_email = settings.EMAIL_HOST_USER,
to = [email,] #more email address can be added
)

message.mixed_subtype = 'related'
message.attach_alternative(body, "text/html")
message.send()


Tuesday, June 14, 2022

Setup Google Analytics with React JS web application - Part 1

We need to navigate to the analytics page of Google first using the link https://analytics.google.com. If we are new to google analytics (ga) we will see a welcome screen like the below image.

Once click on the "Start measuring" button it will show an account setup screen where we need to enter any name for "Account name" field then tick on "Google products and services" option if needed and click on "Next" button.


The Property setup window will show where you have to enter any value which represents your web application. After entering a name click on "Next" button.

It will ask for some details about the business like which category the business belongs to and the business size and some other data. Once fill it click on the Create button shown bottom part of the screen.


Once click on Create button it will pop up a message where we need to accept the terms of service. There might be more than one check box that needs to be ticked. Scroll down in the popup and tick all the checkboxes then click on the "I Accept" button.

Once we did the above setup it will show the dashboard. The Data Streams tab in the left panel is chosen automatically and it will display the option to choose our platform. Here we will choose Web as our platform since we are going to add analytics for our react web application.


Once the web button is clicked in the above step it will bring up a popup window where we have to choose a website URL of our react web app. If we already know the URL where we are going to publish our web app then we can enter that URL in the Website URL field. If we don't know the URL we can just give some testing URL. Also in the Stream name, we have to provide a value, here we can say the website name if we already know it otherwise we can just give any value. Once we have given values for both of the above-mentioned fields we need to click on the "Create stream" button.


After that Web stream details page will appear where we have to copy the code in the Tagging instructions section. Click on the Global site tag option then it will grow to show the code which will look like the below image. Copy the shown code using the copy button provided tehre.


Next, we have to add react-ga package which we are going to use to send the data from our web application to google analytics. To install the above package using npm package manager uses the command "npm install react-ga". This command need to be run from inside the current react js project directory.
npm install react-ga

After that, we need to open the file called index.html inside the public directory of the react js project. Here we need to be more careful that we are going to open the folder named public, not the folder src which normally we use. Past the code which we copy from the above step inside the head tag of the above-mentioned index.html file. Once we copy the file will look like the below image.


We will see how to track the analytics in the next article...

Sunday, June 5, 2022

create-react-app inside a already created folder

 Once we create a GitHub repository and cloned it into the local machine for development. We can use the same repository to hold the react app.

If we are using create-react-app most of the time we use it with a project name which will be the folder name for the react project. In this case we use something like create-react-app my-app here the folder named my-app will be created and will hold the react project.

Anyhow If we wanted to create a react project inside the cloned repository from GitHub or already named directory we could do it using create-react-app . command (notice the '.'). It will create put all the react code inside already created or cloned folder.

Thursday, September 5, 2019

Append text to a file in Laravel


In Laravel some time you want to add error logging or some other text information related to your code running status in a file. I'm going to show how you can achieve that

First you need to use the inbuilt File class inside your controller, for that include the below line on the controller above your class definition (Refer the below picture)
use File;


Once you include the above line now you can call the function from the File class, the function we need for appending the text to a file is append() function.

This function will append any text you are providing to the end of the already created file, or if the file is not available it will create a file in the name you provide and append the text to it.

Next thing is we need to pass two parameters to this function, first parameter is storage location with file name and the second one is the text you want to append (Refer the belo picture)


In the above picture I'm using a function in the place of storage location and file name, which is storage_path() this function will get the storage directory in the root path of your laravel application. and if the file is available on that location it will append the text to the particular file or else it will create a file inside the storage directory and append the text to it


In the above picture once this function run first time it will create a file called error.log inside logs directoy which is there inside the storage directory and append the text "Error 1" to it without the quotes.
Note:
* The append function will not create the folder if it is not available already, so it will pass an error. In the above case, If there is no logs directory you need to create logs directory inside storage directory to successfully test the code

Tuesday, April 5, 2016

CakePHP for newbies Part 1

Hi Guys,

I have learnt some thing today about CakePHP and I'm using it for my new web based application, I would like to share some thing with you,

I would like to give some of basic practicality issue without diving into theory because you can find the theory in the below official link.
http://book.cakephp.org/3.0/en/index.html

Before installing CakePHP framework we need to install local servers if we are using our own PC in the development,
I would like to install WAMP server as my local server
Before installing WAMP server in windows machine first install the Visual C++ Redistributable for Visual Studio from the below link
http://www.microsoft.com/en-us/download/details.aspx?id=30679

After that you can download and install WAMP server from the below link.
http://www.wampserver.com/en/

Once the installation finishes you can run the WAMP server but in windows 10 it will conflict with the locally running windows www service therefor the icon of the WAMP server looks like the below


If the WAMP server icon looks like the above, you should stop the www service from your machine, to stop the WWW service please follow the below,

    1. Type the word "services" in the search box at task bar

   2. Click on the Services Desktop app
   3. In the services window scroll down to look the WWW services, look at the below image

   4. Right click on the World Wide Publishing service and select stop in the context menu like the              below image

After stopping the WWW service, now restart the WAMP server by right clicking the WAMP server icon in the task bar and check the color, it has to change into green.

Now you can just type localhost in the browser address bar and it will looks like the below


Saturday, April 27, 2013

Exercise - 01 Microsoft Office (Edickson Lanka (Pvt) Ltd.)


Create Sample Data

  1. Type =rand().
  2. Press Enter. Three paragraphs appear in your document.

Select with the Shift and Arrow Keys

  1. Place your cursor before the word "On" in the first paragraph.
  2. Press and hold down the Shift key, which serves as an "anchor" showing where text you wish to select begins or ends.
  3. Press the right arrow key until the first line of text is highlighted.
  4. Press the down arrow key until the first paragraph is highlighted.
  5. Click anywhere outside the highlighted area to remove the highlighting.

Select with the Mouse

  1. Place your cursor before the word "You" in the second paragraph.
  2. Press and hold down the left mouse button.
  3. Drag the mouse until you have highlighted the second paragraph.
  4. Click anywhere outside the highlighted area to remove the highlighting.

Place the Cursor

During the lessons, you will often be asked to place the cursor at a specific location (the insertion point) on the screen. You place the cursor by moving the cursor to the specified location and pressing the left mouse button or by using the arrow keys to move to the specified location.

EXERCISE 2

The Arrow Keys

  1. Use the down arrow key to move down your document.
  2. Use the right arrow key to move to the right.
  3. Use the up arrow key to move up.
  4. Use the left arrow key to move to the left.
Cursor
  1. Move around you document by using you mouse and clicking in a variety of location.
  2. Click in a location and type. Note what happens.

Execute Commands with Keyboard Shortcuts

There are many methods you can use to accomplish tasks when using Word. Generally, you choose an option by clicking the option on the Ribbon. However, you can also use shortcut keys. A key name followed by a plus and a letter means to hold down the key while pressing the letter. For example, Ctrl+b means you should hold down the Ctrl key while pressing "b." A shorthand notation of the above would read as follows:
Press Ctrl+b
Typists who are slowed down by using a mouse usually prefer using keys.

Start a New Paragraph

When you type in Microsoft Word, you do not need to press a key to move to a new line. To start a new paragraph, press the Enter key. 

Exit Word

You have completed Lesson One. Typically, you save your work before exiting.

EXERCISE 3

Close and Save—Windows Vista

Exit Word 1
  1. Click the Microsoft Office button. A menu appears.
  2. Click Exit Word, which you can find in the bottom-right corner.
Exit Word 2
  1. You are prompted: "Do you want to save changes to Document1?" To save your changes, click Yes. Otherwise, click No. If you click Yes, the Save As dialog box appears.
Exit Word 3
  1. Move to the correct folder.
  2. Name your file by typing Lesson One.doc in the File Name field.
  3. Click Save. Word saves your file.

Close and Save—Windows XP

  1. Click the Microsoft Office button. A menu appears.
  2. Click Exit Word, which is in the bottom-right corner.
  3. You will be prompted: "Do you want to save changes to Document1?" To save your changes, click Yes. Otherwise, click No. If you click Yes, the Save As dialog box appears.
  4. Specify the correct folder in the Save In box.
  5. Name your file by typing Lesson One.doc in the File Name field.
  6. Click Save. Word saves your file.

Tuesday, June 12, 2012

Simple Java 1


Hi Guys,
I’m going to talk about Java Programming Language briefly from the basic.

If you guys interested on Java you may refer this articles and you may ask questions regarding this article to improve my knowledge on Java.

Java is a high-level Object Oriented programming language originally developed by Sun Microsystems and released in 1995.

Java runs on a variety of platforms, such as Windows, Mac OS, and the various versions of UNIX. 

Because Java is platform independent programming language.

What is platform independence?

Java solves the problem of platform-independence by using byte code. 

The Java compiler does not produce native executable code for a particular machine like a C compiler would. 

Instead it produces a special format called byte code. Java byte code written in hexadecimal, byte by byte, looks like the below:

CA FE BA BE 00 03 00 2D 00 3E 08 00 3B 08 00 01 08 00 20 08

This looks a lot like machine language, but unlike machine language Java byte code is exactly the same on every platform. 

So the same byte code from all OS makes Java as platform independence

You can Compile and Execute all the Java Examples provide on this article by Installing Java on your PC form this link http://java.com/en/download/index.jsp or you can compile and execute online by using this link http://www.compileonline.com/compile_java_online.php


Thursday, March 29, 2012

What is the Answer for 6÷2(1+2) , Is it 9 or 1

Hi guys,

It is a mathematical problem, How can we solve this If we use BODMAS/ PEMDAS the answer can be 1 or 9.
Lets try this
  6÷2(1+2)
  =6÷2(3)
  =6÷2*3
  =6÷6
  =1

OR


6÷2(1+2)
  =6÷2(3)
  =6÷2*3
  =3*3 because 6÷2 is 3
  =9


In BODMAS order Bracket, Order, Division, Multiplication, Addition, Subtraction
In PEMDAS order  Parenthesis, Exponentiation, Multiplication,  Division , Addition, Subtraction

So the above two operation orders are contradict each other by changing the position of Multiplication and Division but mathematically the both Operators have same procedural.

So, If Multiplication and Division come next to each other We can solve the problem by applying left to right order. That is the left operator should solve first and after that the second left operator.

If we apply above theory to the problem

=6÷2*3
=6÷2 = 3
=3*3 = 9

But that is not the way, The way of doing this is,

if the answer is 9
1. plug an unknown value for any digit so that the equation should looks like the below
       6÷Y(1+2) = 9
2. Now solve the equation for finding out the value for Y
       6÷1Y+2Y = 9
       6÷3Y = 9
       6 = 9*3Y
       6÷9 = 3Y
       0.667 = 3Y
       Y = 0.667 ÷ 3
       Y = 0.222
We know in our equation we replace 2 by  Y so, Y should come as 2 So,

if the answer is 1

1. plug an unknown value for any digit so that the equation should looks like the below
       6÷Y(1+2) = 1
2. Now solve the equation for finding out the value for Y
       6÷1Y+2Y = 1
       6÷3Y = 1
       6 = 1*3Y
       6÷1 = 3Y
       6 = 3Y
       Y = 6 ÷ 3
       Y = 2                Yes that's it we have got Y=2 if the answer is 1 So, the answer for 6÷2(1+2) = 1


Wednesday, March 28, 2012

Money For You If it is true?

Hi Guys,

I was at busy moment on the internet and had a chance to read something about wazzub and I have search about it on google. The yahoo answer give me some good information about wazzub You also can read that on the link http://answers.yahoo.com/question/index?qid=20111229144031AALiIap
and if you pretty confident please visit the link below and register with wazzub

1) http://signup.wazzub.info/?lrRef=414db4a6


2) http://signup.wazzub.info/?lrRef=3ea009a3

Ok guys see you later...

Thursday, February 2, 2012

Connecting Visual Basic 2010 with MySql database Cont...

Today We are going to learn that, How to write code in VB 2010 for connect to MySql Database

1. Open up new Visual Studio Project and create a form

2. Right Click on the form you create, and choose view code option

3. In the window you have shown, Type the code below

Imports MySql.Data.MySqlClient

the above line should be appear in the very top of the window that is, The above line should be type above public class formname

After that type the below code after the class declaration, That is after the line
public class formname


Dim ServerString As String = "Server=localhost;User Id=root;Password=pass;Database=dtbname"
Dim SQLConnection As MySqlConnection = New MySqlConnection

The above code line I use my server as localhost and user id as root password for the root is pass and the database is dtbname. You can use your own database details instead of the above

The second line of above code should be typed like what I have entered but you can change only the variable name SQLConnection to your own variable name

After that type the code below


SQLConnection.ConnectionString = ServerString


        Try
            If SQLConnection.State = ConnectionState.Closed Then
                SQLConnection.Open()
            Else
                SQLConnection.Close()
                MsgBox("Connection is closed")
            End If
        Catch ex As Exception
            MsgBox(ex.ToString)
        End Try

Thats it you have connected to MySql database from Visual Basic 2010

Tomorrow we will show how to retrieve data from MySql table....

Sunday, January 1, 2012

Connecting Visual Basic 2010 with MySql database

Hi guys,

I'm going to show you, how to connect VB 2010 with MySql database

1. You have to download WAMP SERVER 2.2A or other versions for your windows operating system. If you are using 64 bit OS you have to download 64 bit compatible version of  WAMP SERVER 2.2A.


You can download WAMP SERVER 2.2A for your OS in this link http://www.wampserver.com/en/


2. Install the WAMP SERVER 2.2A by running the downloaded file

3. Download mysql database connecter. You can get it from this link http://www.mysql.com/downloads/connector/net/

4 Run the downloaded connecter to attach it with VB 2010 Reference list

5 Open Visual Studio 2010 and create new windows application

6 In solution explorer window click Show All File button


7 Right click on References folder in the window shown above and select add references option

8 Select the Brows tab on showing Addreference window navigate to Programe Files (x86) by clicking the down arrow in Look in combo box

And You will be shown a folder called MySql


Double click the MySql Folder and go beyond by clicking until get Go to \MySQL Connector Net 6.4.4\Assemblies\v4.0 and you will be having a window like the one below shown

Double click on MySql.Data.dll and you will be getting to your Visual Studio main window from thetre click on Solution Explorer à  References à Addreference like the above process you will be having a window like the above one and choose the .NET tab in the shown window

9. In the shown window click on Component Name tab after that scroll the scroll bar until getting to the MySql.Data file

Double click on MySql.Data that’s it now you can make connection to your WAMP SERVER and can add data retrieve data

Tomorrow We will show  code in visual basic for adding and receiving data to MySql tables……


  Screen shot Demo is shown below....


Friday, July 8, 2011

Basic Java Class

Hi! Today I'm going to talk some thing about the basic java source file
We know all programming languages has to compile before they execute to change the platform.
Java source file can be write in notepad or any other IDEs like NetBeans and what ever the IDE or notepad we are using we have to follow some restrictions to make compile our code.
In our source file the first part that is the top part of the source file must be the package declaration part which declare our source file to a particular place where some other source files also can be included.

The second part will be the import statement part which tell the compiler some source file we have to attached from other packages to our package because we are using the source code of that particular package.

The third thing i the class declaration where our favourite java class going to be declared.

If we don't have the first part and second part we talked above. The class declaration will be the first part

for example :

class Test{


The above code just compile fine and can't run the file because the JVM looks for the main method for starting the execution our above code don't have main method so at the runtime JVM pass an exception.

If we make the class as public we have to have the sourcefile name as same to the public class name. One java file can contain more than one class but only one class can declare as public and if a class declared public the source file must be named as the public class name

Full Example

package myPackage;//package declaration

import java.util.*;//import statement
import java.io.*; //import statement

public class A{
B b = new B();
}

class B{
Random random = new Random();
}


the above class must be named as A.java

Sunday, June 26, 2011

Getting the Method Information of a given class

Hello guys After some time,
All Java Programmers and Developers Know java is a Object Oriented Programming language. Java can be explain with few words, which is "classes and make objects using the class and interact between objects" so every object have the template as their classes.
Here we are going to show how can we get the information of a given class at the run time. To overcome the problem we have to use the Reflection API which is inbuilt with jdk. Reflection is a very useful tool for developers because if we would like to make some changes to our class at runtime it is the most suitable way.
I would like to show a small program which will provide the all methods of a given class at runtime.
import java.lang.reflect.*;
public class MethodsFinder {
  public static void main(String args[]){
         try {
            Class classes = Class.forName(args[0]);
            Method[] methods = classes.getDeclaredMethods(); 
            System.out.println(classes);
            for (int i = 0; i < methods.length; i++)
            System.out.println(methods[i].toString());
         }
         catch (Exception e) {
            System.err.println("Your error is " + e);
         }
      }
   }Save the above code in a notepad, name the notepad as "MethodsFinder.java"
Compile the source file as     "javac MethodsFinder.java"
and run the file by giving your class as argument as java MethodsFinder java.lang.String
the above underline class is my argument therefor It will provide the output as


 The above output shows all the methods of String class which is an inbuilt class in java. We can get the method details of any given classes just by changing the argument at runtime. Ok guys I thing you have got my point and do it yourself.