Monday, February 6, 2023

Python Literals: Understanding the Building Blocks of Python Programming

 Python is a high-level programming language that is widely used for web development, data analysis, and artificial intelligence. One of the fundamental building blocks of Python programming like many other programming languages is literals, which are fixed values used to represent data in a program. In this article, we will discuss what literals are and how they are used in Python.

What are Python Literals?

Literals in Python are fixed values that can be used to represent data in a program. They can be numbers, strings, booleans, or special objects that represent complex data structures, such as lists, tuples, sets, and dictionaries. Literals are used to create objects that have a fixed value and cannot be changed during the execution of the program.

Types of Python Literals

  1. Numeric Literals: Numeric literals in Python can be either integers or floating-point numbers. Integer literals are written as a sequence of decimal digits, while floating-point literals are written with a decimal point. For example, the integer literal 10 and the floating-point literal 3.14 are both valid numeric literals in Python.

    Also, binary, octal, hexadecimal representations of the numeric literals can be declared in python using their appropriate prefix with zero (0).

    binary = 0b11
    octal = 0o765
    hexa = 0xab10
  2. String Literals: String literals in Python are sequences of characters enclosed in quotes, either single quotes (') or double quotes ("). For example, "Hello, World!" is a valid string literal in Python.

  3. Boolean Literals: Boolean literals in Python are either True or False. They are used to represent logical values and are often used in control structures, such as if-else statements.

  4. Complex Literals: Complex literals in Python represent complex numbers and are written in the form x + yj, where x is the real part and y is the imaginary part. For example, 3 + 4j is a valid complex literal in Python.

  5. Special Literals: Special literals in Python represent special objects that have specific meanings, such as None, which represents the absence of a value.

How to Use Literals in Python

Literals can be used in various ways in Python programs. For example, they can be assigned to variables, used as arguments in function calls, or used as elements in data structures, such as lists, tuples, and dictionaries.

For example, the following code demonstrates how to use numeric, string, and boolean literals in Python:

# Assigning numeric literals to variables
a = 10
b = 3.14

# Assigning string literals to variables
name = "Feather"

# Assigning boolean literals to variables
is_active = True

Conclusion

In conclusion, literals are an essential part of Python programming and play a crucial role in representing data in a program. They can be numbers, strings, booleans, or special objects and are used to create objects with a fixed value. Understanding literals is key to becoming a proficient Python programmer and is the foundation for more advanced concepts, such as data structures, functions, and control structures.

Saturday, June 25, 2022

Sending Emails from Python Django using your gmail account

Normally applications need to send the verification code or welcome messages to the registering user for their application using emails. 

Sending email is not hard in if we are developing the backend of the application using Python or Python framework like Django. 

As the first step we need to configure our gmail account to allow us to send email using code without login in to gmail and sending manually. 

  1. Login to your gmail account 
  2. Click on the profile icon shown in the top right corner of the browser window in gmail
  3. Click on "Manage your Google Account" button like shown in the below image.


  4. Choose Security tab in the screen shown after the above step


  5. Scroll down to see the section "Signing in to Google" section
  6. Enable two step verification there by giving your mobile number or some other method of verification. 

  7. Once clicked on Get Started button on the popup ti will ask you to login again.
  8. Once the above step finished you can see a new item in the "Signing in to Google" section which will look like the below

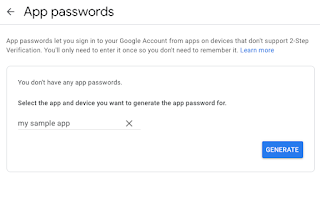
  9. Click on the App passwords in the above mentioned window which will open up another screen where you have to select the custom app name and generate a password. 


  10. Once you give a name for your app the "GENERATE" button will be enabled click on it to generate the password and copy the password. The password shown here is only showing one time there for carefully copy it and past it in a place where you can access later.
We have finished the configuration of gmail now. We can use the gmail as the sender email in our Django code.

Goto the Django settings file and make the configuration settings like below 

EMAIL_BACKEND = 'django.core.mail.backends.smtp.EmailBackend'
EMAIL_HOST = 'smtp.gmail.com'
EMAIL_USE_TLS = True
EMAIL_PORT = 587

EMAIL_HOST_USER = 'your_username@gmail.com' # replace your_username
EMAIL_HOST_PASSWORD = 'xxxxxxxxxxxxxxxx' # use password generated above

In your model file you need to import the EmailMultiAlternatives from Django core module then you can send the email using the below lines of code.

from django.core.mail import EmailMultiAlternatives  

message = EmailMultiAlternatives(
subject = subject,
body = body,
from_email = settings.EMAIL_HOST_USER,
to = [email,] #more email address can be added
)

message.mixed_subtype = 'related'
message.attach_alternative(body, "text/html")
message.send()


Tuesday, June 14, 2022

Setup Google Analytics with React JS web application - Part 1

We need to navigate to the analytics page of Google first using the link https://analytics.google.com. If we are new to google analytics (ga) we will see a welcome screen like the below image.

Once click on the "Start measuring" button it will show an account setup screen where we need to enter any name for "Account name" field then tick on "Google products and services" option if needed and click on "Next" button.


The Property setup window will show where you have to enter any value which represents your web application. After entering a name click on "Next" button.

It will ask for some details about the business like which category the business belongs to and the business size and some other data. Once fill it click on the Create button shown bottom part of the screen.


Once click on Create button it will pop up a message where we need to accept the terms of service. There might be more than one check box that needs to be ticked. Scroll down in the popup and tick all the checkboxes then click on the "I Accept" button.

Once we did the above setup it will show the dashboard. The Data Streams tab in the left panel is chosen automatically and it will display the option to choose our platform. Here we will choose Web as our platform since we are going to add analytics for our react web application.


Once the web button is clicked in the above step it will bring up a popup window where we have to choose a website URL of our react web app. If we already know the URL where we are going to publish our web app then we can enter that URL in the Website URL field. If we don't know the URL we can just give some testing URL. Also in the Stream name, we have to provide a value, here we can say the website name if we already know it otherwise we can just give any value. Once we have given values for both of the above-mentioned fields we need to click on the "Create stream" button.


After that Web stream details page will appear where we have to copy the code in the Tagging instructions section. Click on the Global site tag option then it will grow to show the code which will look like the below image. Copy the shown code using the copy button provided tehre.


Next, we have to add react-ga package which we are going to use to send the data from our web application to google analytics. To install the above package using npm package manager uses the command "npm install react-ga". This command need to be run from inside the current react js project directory.
npm install react-ga

After that, we need to open the file called index.html inside the public directory of the react js project. Here we need to be more careful that we are going to open the folder named public, not the folder src which normally we use. Past the code which we copy from the above step inside the head tag of the above-mentioned index.html file. Once we copy the file will look like the below image.


We will see how to track the analytics in the next article...

Sunday, June 5, 2022

create-react-app inside a already created folder

 Once we create a GitHub repository and cloned it into the local machine for development. We can use the same repository to hold the react app.

If we are using create-react-app most of the time we use it with a project name which will be the folder name for the react project. In this case we use something like create-react-app my-app here the folder named my-app will be created and will hold the react project.

Anyhow If we wanted to create a react project inside the cloned repository from GitHub or already named directory we could do it using create-react-app . command (notice the '.'). It will create put all the react code inside already created or cloned folder.

Thursday, September 5, 2019

Append text to a file in Laravel


In Laravel some time you want to add error logging or some other text information related to your code running status in a file. I'm going to show how you can achieve that

First you need to use the inbuilt File class inside your controller, for that include the below line on the controller above your class definition (Refer the below picture)
use File;


Once you include the above line now you can call the function from the File class, the function we need for appending the text to a file is append() function.

This function will append any text you are providing to the end of the already created file, or if the file is not available it will create a file in the name you provide and append the text to it.

Next thing is we need to pass two parameters to this function, first parameter is storage location with file name and the second one is the text you want to append (Refer the belo picture)


In the above picture I'm using a function in the place of storage location and file name, which is storage_path() this function will get the storage directory in the root path of your laravel application. and if the file is available on that location it will append the text to the particular file or else it will create a file inside the storage directory and append the text to it


In the above picture once this function run first time it will create a file called error.log inside logs directoy which is there inside the storage directory and append the text "Error 1" to it without the quotes.
Note:
* The append function will not create the folder if it is not available already, so it will pass an error. In the above case, If there is no logs directory you need to create logs directory inside storage directory to successfully test the code

Tuesday, April 5, 2016

CakePHP for newbies Part 1

Hi Guys,

I have learnt some thing today about CakePHP and I'm using it for my new web based application, I would like to share some thing with you,

I would like to give some of basic practicality issue without diving into theory because you can find the theory in the below official link.
http://book.cakephp.org/3.0/en/index.html

Before installing CakePHP framework we need to install local servers if we are using our own PC in the development,
I would like to install WAMP server as my local server
Before installing WAMP server in windows machine first install the Visual C++ Redistributable for Visual Studio from the below link
http://www.microsoft.com/en-us/download/details.aspx?id=30679

After that you can download and install WAMP server from the below link.
http://www.wampserver.com/en/

Once the installation finishes you can run the WAMP server but in windows 10 it will conflict with the locally running windows www service therefor the icon of the WAMP server looks like the below


If the WAMP server icon looks like the above, you should stop the www service from your machine, to stop the WWW service please follow the below,

    1. Type the word "services" in the search box at task bar

   2. Click on the Services Desktop app
   3. In the services window scroll down to look the WWW services, look at the below image

   4. Right click on the World Wide Publishing service and select stop in the context menu like the              below image

After stopping the WWW service, now restart the WAMP server by right clicking the WAMP server icon in the task bar and check the color, it has to change into green.

Now you can just type localhost in the browser address bar and it will looks like the below


Saturday, April 27, 2013

Exercise - 01 Microsoft Office (Edickson Lanka (Pvt) Ltd.)


Create Sample Data

  1. Type =rand().
  2. Press Enter. Three paragraphs appear in your document.

Select with the Shift and Arrow Keys

  1. Place your cursor before the word "On" in the first paragraph.
  2. Press and hold down the Shift key, which serves as an "anchor" showing where text you wish to select begins or ends.
  3. Press the right arrow key until the first line of text is highlighted.
  4. Press the down arrow key until the first paragraph is highlighted.
  5. Click anywhere outside the highlighted area to remove the highlighting.

Select with the Mouse

  1. Place your cursor before the word "You" in the second paragraph.
  2. Press and hold down the left mouse button.
  3. Drag the mouse until you have highlighted the second paragraph.
  4. Click anywhere outside the highlighted area to remove the highlighting.

Place the Cursor

During the lessons, you will often be asked to place the cursor at a specific location (the insertion point) on the screen. You place the cursor by moving the cursor to the specified location and pressing the left mouse button or by using the arrow keys to move to the specified location.

EXERCISE 2

The Arrow Keys

  1. Use the down arrow key to move down your document.
  2. Use the right arrow key to move to the right.
  3. Use the up arrow key to move up.
  4. Use the left arrow key to move to the left.
Cursor
  1. Move around you document by using you mouse and clicking in a variety of location.
  2. Click in a location and type. Note what happens.

Execute Commands with Keyboard Shortcuts

There are many methods you can use to accomplish tasks when using Word. Generally, you choose an option by clicking the option on the Ribbon. However, you can also use shortcut keys. A key name followed by a plus and a letter means to hold down the key while pressing the letter. For example, Ctrl+b means you should hold down the Ctrl key while pressing "b." A shorthand notation of the above would read as follows:
Press Ctrl+b
Typists who are slowed down by using a mouse usually prefer using keys.

Start a New Paragraph

When you type in Microsoft Word, you do not need to press a key to move to a new line. To start a new paragraph, press the Enter key. 

Exit Word

You have completed Lesson One. Typically, you save your work before exiting.

EXERCISE 3

Close and Save—Windows Vista

Exit Word 1
  1. Click the Microsoft Office button. A menu appears.
  2. Click Exit Word, which you can find in the bottom-right corner.
Exit Word 2
  1. You are prompted: "Do you want to save changes to Document1?" To save your changes, click Yes. Otherwise, click No. If you click Yes, the Save As dialog box appears.
Exit Word 3
  1. Move to the correct folder.
  2. Name your file by typing Lesson One.doc in the File Name field.
  3. Click Save. Word saves your file.

Close and Save—Windows XP

  1. Click the Microsoft Office button. A menu appears.
  2. Click Exit Word, which is in the bottom-right corner.
  3. You will be prompted: "Do you want to save changes to Document1?" To save your changes, click Yes. Otherwise, click No. If you click Yes, the Save As dialog box appears.
  4. Specify the correct folder in the Save In box.
  5. Name your file by typing Lesson One.doc in the File Name field.
  6. Click Save. Word saves your file.